HTML for Complete Beginners
This tutorial is for complete beginners in HTML who want to learn basic web development and web design
What is HTML?
HTML stands for HyperText Markup Language, and as the name says HTML is not a programming language but a markup language for creating web pages. HTML is strictly presentational, it doesn't have any logic, it is just for displaying elements in a web page like an image, text, list, etc. HTML is a very important part of web development, it is a building block of the web, every web site out there output HTML in the browser, and a web site can be built just with HTML (although will not look very good). To start building web sites with HTML you will need a text editor(Visual Studio Code, Sublime, Atom, etc) and a web browser(Chrome, Firefox, Safari, etc). HTML code lives in .html files and doesn't need a server to be run, it can run simply in a web browser. In most of the cases, there is a index.html which is the home page of a website.
How to Write HTML Code
To get started we will make a folder called html-for-absolute-beginners and inside that folder, we will make a file called index.html. Then we will
simply open that file in our favorite text editor. If we write anything in the index.html, for example, a Hello, World, and then open the same file in our browser we will see the text Hello, World displayed in the browser.
Hello, World
index.html
Most of the time we will not write simple text like this in our HTML files, instead, we will be using an HTML Tags.
HTML Tags and Elements
Tags are the building block of HTML, every tag format the information we want to display which can be text, image, etc. HTML element structure looks like this:
<tagname>content</tagname>
html element example
Elements usually have a start tag and end tag and content in the middle, in some cases tags close themselves. Tags can be inline or block-level elements.
You can find HTML documentation with every tag/element on the developer.mozilla.org.
HTML Page Structure
html page structure example
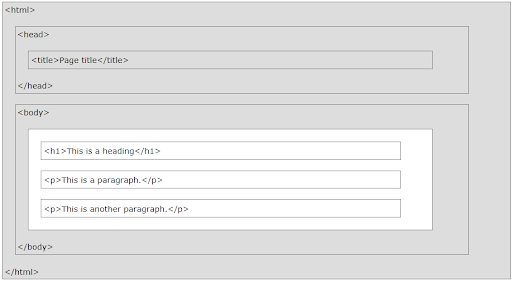
As you can see in the example above, there is a specific structure in every HTML document which everything is nested in elements starting with the <html></html> element which represents the root of an HTML document, inside we have <head></head> which is a container for metadata and <body></body> area which contains all the content of an HTML document such as headings, paragraphs, images, hyperlinks, tables, lists, etc.
HTML Example
Firstly thing we want to put in every HTML document is the <!DOCTYPE html> which is an "information" to the browser about what document type to expect. The next thing is the <html> element like we saw in the HTML structure before. Inside the <head> we have the <title> element which is required and it defines the title of the HTML document.
<!DOCTYPE html>                       <!--Type of the document type to expect-->
<html>                                <!--Root of an HTML document-->
  <head>                              <!--Container for metadata-->
    <title>HTML for beginners</title> <!--Defines the title of the document-->
  </head>
  <body>                              <!--Contains all the contents of an HTML document-->

  </body>
</html>
index.html - very basic HTML document
On the right side there are comments which are: , comments are not shown in the browser, they are just visible to the developer.
Headings
As you can see in the example, there are six different heading elements we can use: <h1>, <h2>, <h3>, <h4>, <h5>, <h6>, which <h1> defines the most important heading and <h6> defines the least important heading, also the size of each heading is not the same by default, you can later change the size with CSS.
<!DOCTYPE html>
<html>
  <head>
    <title>HTML for beginners</title>
  </head>
  <body>
    <!--Headings-->
    <h1>Heading One</h1>
    <h2>Heading Two</h2>
    <h3>Heading Three</h3>
    <h4>Heading Four</h4>
    <h5>Heading Five</h5>
    <h6>Heading Six</h6>
  </body>
</html>
Only use one
<h1>per page, this should be the main heading/subject for the whole page. Also, you should not skip heading levels.
Paragraph
The paragraph in HTML is just the <p> element, we can use a paragraph to put a block of text inside of it. Every paragraph always starts on a new line, and browsers automatically add some white space before and after a paragraph.
<!DOCTYPE html>
<html>
  <head>
    <title>HTML for beginners</title>
  </head>
  <body>
    <!--Paragraph-->
    <p>
      Some random short or long <strong>paragraph</strong> text goes <em>here</em>
      if you want to learn more click <a href="www.google.com">here</a>
    </p>
  </body>
</html>
Inline vs Block Elements - Inline elements do not start a new line and take only the necessary width, Block elements start on a new line and take the full width.
Strong and Em
The first tags which we have seen were block elements, now let's see some of the inline elements. As you can see in the example we have a <strong> tag in the middle of the paragraph which is telling that the content inside the <strong> tag will be bold. Next is the <em> tag which is used for italic who is also inside the paragraph.
Link
If we want to link some content on our page we need to use the <a> tag. For the link element to work, we need to give it an attribute href="some link" which is the link we want to use it, like in the example if we click on the link it will take us to the linked page. The href attribute can be an external or internal link. Another important attribute for a link is the target="_blank" which will open the link in a new tab (usually you will use this if the link is an external site).
HTML attributes provide additional information about HTML elements which are always specified in the start tag. Attributes are written as key/value.
Lists
In HTML there are also list elements, which are much important for displaying data. There are two types of list elements, ordered list <ol> and unordered list <ul>. Inside the lists, we need to have list items which are <li> elements, and inside of we will put the content. The difference between the ordered list and unordered list is that in the ordered list every item has a number, in the unordered list every item has a bullet point.
<!DOCTYPE html>
<html>
  <head>
    <title>HTML for beginners</title>
  </head>
  <body>
    <!--Lists-->
    <ol>
      <li>Item 1</li>
      <li>Item 2</li>
      <li>Item 3</li>
    </ol>

    <ul>
      <li>Item 1</li>
      <li>Item 2</li>
      <li>Item 3</li>
    </ul>
  </body>
</html>
Br and Hr
There are <br> which is nothing more but just a line break, you can use <br> to separate some content (which can be also done with CSS). Also, there is a <hr> which is a horizontal rule that is a horizontal line. Both <br> and <hr> are self-closing tags.
<!DOCTYPE html>
<html>
  <head>
    <title>HTML for beginners</title>
  </head>
  <body>
    <br>
    <hr>
  </body>
</html>
Form
Forms are an important part of a web page which will get some data from the user and send to the server, with HTML we are just looking for the form, we cannot add functionality. The form starts with the <form> element, and in most of the cases, the form will have an attribute action="some file" which will submit the form to some page. Also there should be method attribute method="POST" which in most of the cases will be post, which means we are doing a post request to the server, or simply we are sending some data to the server.
<!DOCTYPE html>
<html>
  <head>
    <title>HTML for beginners</title>
  </head>
  <body>
    <!--Forms-->
    <form action="submit.php" method="POST">
      <label>First Name</label>
      <input type="text" name="first_name">
      <input type="submit" name="submit" value="Submit">
    </form>

  </body>
</html>
There are other HTTP requests too like, GET, POST, PUT, DELETE, etc.
Inside the form, we have a <label> element, which is nothing more than just a label for an input field below of it which is declared with the element <input>. The input element has a couple of attributes like type="text" which sets the type of the input field, the next is the name="first_name" is the value which we give to the server-side. Also, you can see that the input element doesn't have a closing tag because it is self-closing. Also, we can use input elements like a button to submit the form which is the last input element in our example. The submit element has a type, name, and value, the first two we already know about them the last one the value is the text of the button.
Button
We can also have a button independent from the form, we can declare a button with the <button> tag. For a button to do something we need to use JavaScript, but in this tutorial, we are gonna focus just on HTML, inside the button element we put the text for the button.
<!DOCTYPE html>
<html>
  <head>
    <title>HTML for beginners</title>
  </head>
  <body>
    <!--Button-->
    <button>Submit</button>

  </body>
</html>
Image
We can use images in HTML with the <img> element, the image element is also with a self-closing tag. To display an image in the image element, we need to give it a source attribute with the src="image_path/url", we can use images from local storage or we can use an image from the web. We can also set the width and height of an image with HTML.
<!DOCTYPE html>
<html>
  <head>
    <title>HTML for beginners</title>
  </head>
  <body>
    <!--Image-->
    <img src="path" width="300"/>

  </body>
</html>
HTML5 Semantic Tags
With HTML5 we can enrich the semantic content of HTML documents, new page structure elements such as
Tweet